
在我的网站的Nginx中启用HTTP/2已经是5年前的事了,是时候启用HTTP/3了。
1. 检查并升级Nginx
要运行HTTP/3,Nginx 版本必须是1.25或更高。运行nginx-v检查现有Nginx的版本。如果和我一样是Ubuntu24.04默认安装的1.24.0版本Nginx,需要手动升级。
升级过程并不复杂,按官方文档https://nginx.org/en/linux_packages.html#Ubuntu 来就好了。
升级结束后再运行一下 nginx -V,注意这里是大写的V。确保–with-http_v3_module在输出里就行。
nginx version: nginx/1.26.3
built by gcc 13.2.0 (Ubuntu 13.2.0-23ubuntu4)
built with OpenSSL 3.0.13 30 Jan 2024
TLS SNI support enabled
configure arguments: --prefix=/etc/nginx --sbin-path=/usr/sbin/nginx --modules-path=/usr/lib/nginx/modules --conf-path=/etc/nginx/nginx.conf --error-log-path=/var/log/nginx/error.log --http-log-path=/var/log/nginx/access.log --pid-path=/var/run/nginx.pid --lock-path=/var/run/nginx.lock --http-client-body-temp-path=/var/cache/nginx/client_temp --http-proxy-temp-path=/var/cache/nginx/proxy_temp --http-fastcgi-temp-path=/var/cache/nginx/fastcgi_temp --http-uwsgi-temp-path=/var/cache/nginx/uwsgi_temp --http-scgi-temp-path=/var/cache/nginx/scgi_temp --user=nginx --group=nginx --with-compat --with-file-aio --with-threads --with-http_addition_module --with-http_auth_request_module --with-http_dav_module --with-http_flv_module --with-http_gunzip_module --with-http_gzip_static_module --with-http_mp4_module --with-http_random_index_module --with-http_realip_module --with-http_secure_link_module --with-http_slice_module --with-http_ssl_module --with-http_stub_status_module --with-http_sub_module --with-http_v2_module --with-http_v3_module --with-mail --with-mail_ssl_module --with-stream --with-stream_realip_module --with-stream_ssl_module --with-stream_ssl_preread_module --with-cc-opt='-g -O2 -fno-omit-frame-pointer -mno-omit-leaf-frame-pointer -ffile-prefix-map=/data/builder/debuild/nginx-1.26.3/debian/debuild-base/nginx-1.26.3=. -flto=auto -ffat-lto-objects -fstack-protector-strong -fstack-clash-protection -Wformat -Werror=format-security -fcf-protection -fdebug-prefix-map=/data/builder/debuild/nginx-1.26.3/debian/debuild-base/nginx-1.26.3=/usr/src/nginx-1.26.3-1~noble -fPIC' --with-ld-opt='-Wl,-Bsymbolic-functions -flto=auto -ffat-lto-objects -Wl,-z,relro -Wl,-z,now -Wl,--as-needed -pie'
2. 编辑Nginx配置文件
a.编辑nginx.conf文件
sudo vi /etc/nginx/nginx.conf首先确保TLSv1.3已经被包括在文件里
 # 添加 QUIC 支持的协议版本
ssl_protocols TLSv1.2 TLSv1.3;
再添加Alt-Svc头
        # 添加 Alt-Svc 头,告诉浏览器使用 HTTP/3
        add_header alt-svc 'h3=":443"; ma=2592000, h3-29=":443"; ma=2592000, h3-Q050=":443"; ma=2592000, h3-Q046=":443"; ma=2592000, h3-Q043=":443"; ma=2592000, quic=":443"; ma=2592000; v="43,46"';
b.编辑site config文件
sudo vi /etc/nginx/sites-available/xxx.com在server { }块中添加以下行。
    # 启用HTTP/3
    listen 443 quic reuseport;   # QUIC over UDP
    listen [::]:443 quic reuseport;  # IPv6
c. 保存,退出,测试Nginx配置并重新加载Nginx
nginx -t
sudo systemctl reload nginx
3. 更新防火墙规则
HTTP/3使用 UDP 443端口,记得要在防火墙上打开,一般默认的都只开了TCP 443端口
4. 测试网站的HTTP/3是否已成功启用
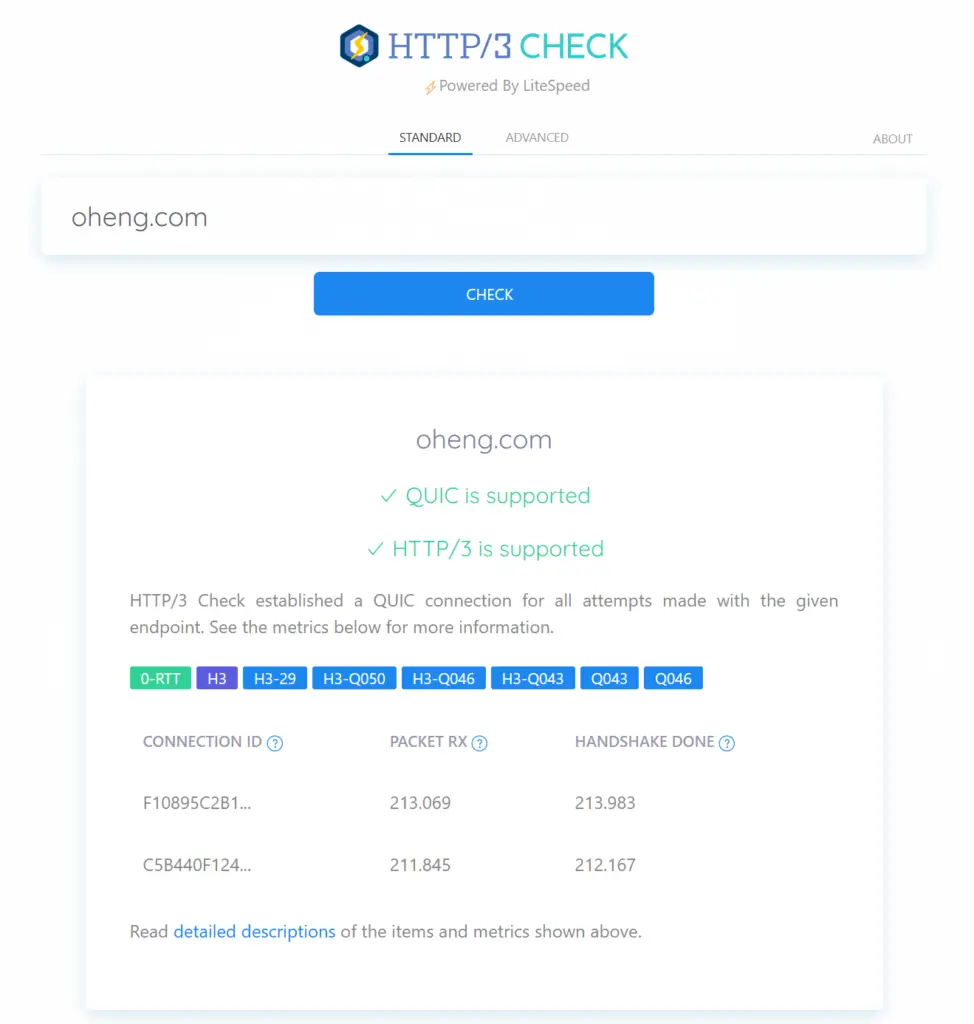
可以使用下面两个网站测试网站的HTTP/3是否已处于激活状态。
成功启用后大致是下面的样子。
5. 受挫
我在网站Oheng.com上启用HTTP/3后,感觉没能给我的网点带来什么性能改进,反倒是让我的网站变慢了许多。
2月11日晚
不提了,启用HTTP/3后:
- 打开网站有时需要1分钟以上
- Dev tools里满屏的 ERR_QUIC_PROTOCOL_ERROR
- php log里都是 [pool www] server reached pm.max_children setting
- 包括WP Super Cache在内的几个插件也不能正常工作了
6. 再战HTTP/3
为了研究HTTP/3受挫到底是国内网络环境的问题,还是我自己的配置问题。我又在我新建的测试网站414080.com上启用了HTTP/3。
重复上面记录的步骤,在五分钟内就搞定了所需的设置。关闭cloudflare代理,打开网站,观察Dev tools里的console记录。发现有两个插件好像和HTTP3有冲突,一直在报错,分别是Optimization Detective 和 Simple Cloudflare Turnstile。 Optimization Detective 是Performance Lab插件的一部分,可有可无, Simple cloudflare Turnsitle 对我的意义也不大。直接把这两个禁用了,console里基本就没啥错了。
又测一下网站性能,完全看不出区别,没开HTTP/3的oheng.com还高一分。
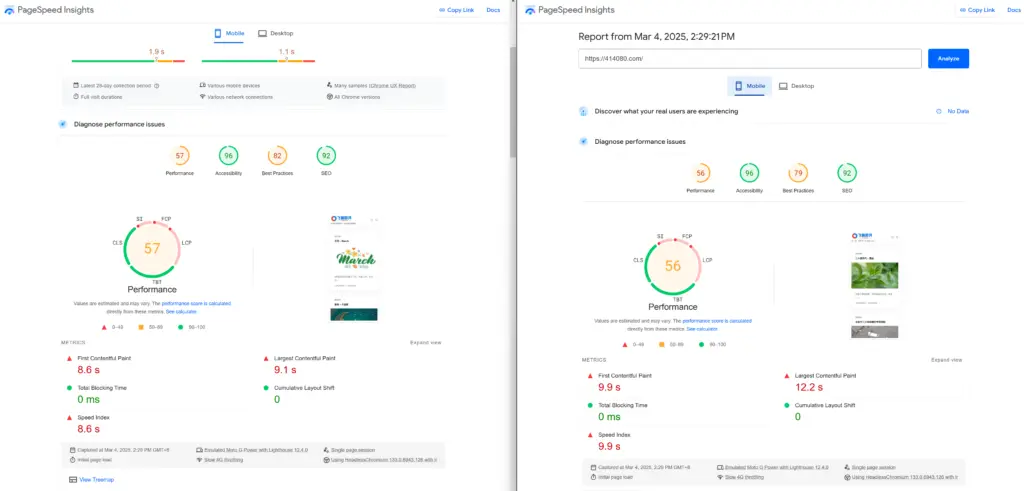
好吧,我也没动力在oheng.com再启用HTTP/3了。
7. 后记
可这是我自娱自乐的网站,又有谁关心这性能呢。该有的都要有,该支持的都要支持,能浪就浪。
说话说得好:不在乎天长地久,只在乎曾经拥有。支持过就行了,我网站的HTTP/3配置已被注释掉了。
HTTP/3我们后会有期。。。


试了一下,我在浏览器F12里看,只有CF的验证脚本等几个外站引用启用的http3,站点主体,图片,JS,CSS还是http2
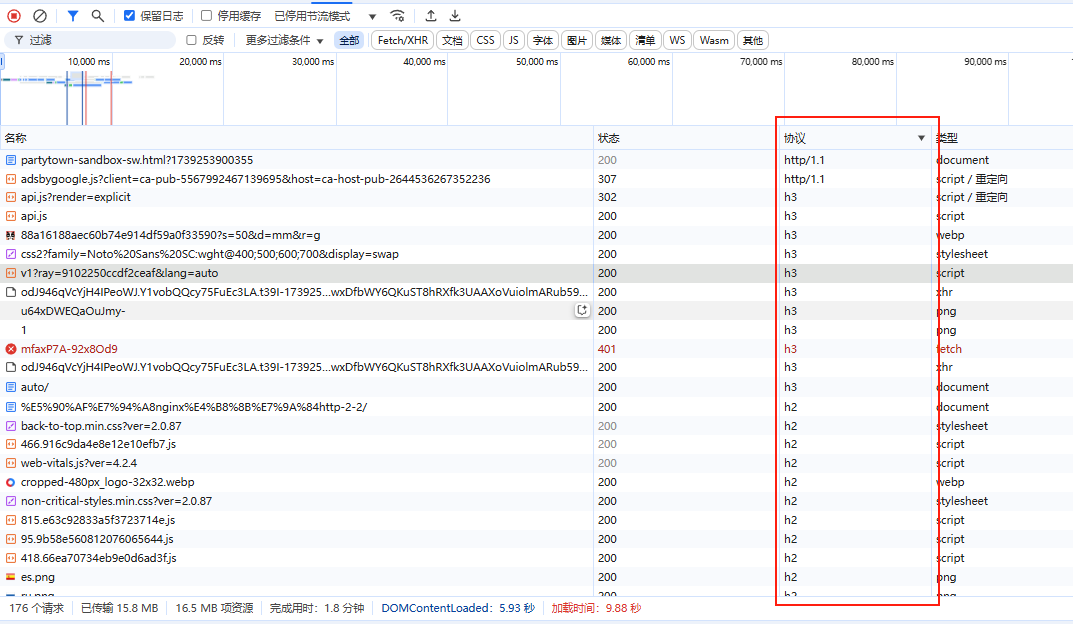
我看了一下,简单的一次刷新就能让我网站上图片文件的从http2协议改为http3,再刷新一次就有可能再回到http2。我觉得这是国内运营商对UDP流量实施更严格的QoS策略,导致QUIC连接成功率低的原因。